By Subhasree Nag
If you’re going to take the time to install a gravel driveway, you should know that taking the right steps during the construction process will minimize the risk of washout. Today, we’re here to share a host of practical tips which will help you to get the job done right!
We believe that the best method of prevention is choosing the right under layer. Luckily, there is one modern under layer option which is practical and so affordable.
It’s designed to help you get great results which make it so easy to park, back out and generally get the most long-lasting functionality from your driveway. We’ll talk about this in-depth a little later…
Plan the Job Out into Several Steps

It’s important to plan the job carefully before it begins. Make a roadmap of things you’ll do from start to finish to get the best result out of your efforts.
Accurate Measurement
You should measure the driveway space, which means marking it out with sticks driven into the ground at intervals and then stretching twine from stick to stick. When you do this, you’ll be primed to take accurate measurements.
Document the Measurement
Make a note of your measurements, as you will need them later when it’s time to order supplies. It’s important to order the right amount of stuff, such as underlayer material and gravel, and we think that good measurements are the key to keeping a budget under control.
These measurements will ensure that you order the right amount, rather than buying too much and paying too much for supplies that aren’t strictly necessary.
Make a List of Supplies Needed
Next, you should come up with a supply list. This is an organized way to make certain that you can put together a realistic budget for the gravel driveway project.
For example, you should think about what tools or machinery you need, how much underlayer material you should buy, and how much gravel is needed.
Plan Your Layers
Most experts think five to seven gravel layers is the best amount for weed deterrence and stability. We tend to agree. So, plan on ordering at least five layers worth.
It may be good to buy a little extra and store it in case you need to fill in gaps. However, if you build your driveway correctly, it will be less prone to the typical pitfalls, such as gravel migration, ruts, and potholes.
Estimate Pricing for Supplies Needed
Once you have your supply list, you’ll be able to price materials. Whether you plan to shop locally or buy what you need online, pricing materials and shopping around online will be a great way to start. After all, most local suppliers these days have websites that are loaded with helpful information.
Choose the Right Types of Gravel
When you’re considering gravel type, we recommend choosing chipping or angular gravel. Both gravel types are known for being less prone to gravel migration.
In particular, if you’re planning to build a sloped driveway, you should know that choosing chipping or angular gravel will help you to enjoy the superb performance, with less gravel migration, over the long term.
Shop Around
So, shop around. Price materials, and don’t forget the materials that you’ll need to build a border if you want one and to level the ground before you add your underlayer. Now, let’s take some time to talk about the ideal material for a strong, weed-resistant layer…
Discover Plastic Gravel Grids
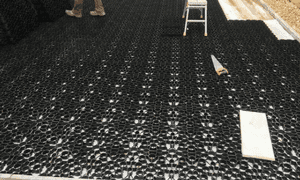
Gravel grids are honeycomb-shaped pieces of plastic which add amazing strength and stability to gravel driveways. In fact, they are really the secret weapon of those who want to make their driveways as strong and long-lasting as possible.
In addition, they deter weed growth and also help gravel to stay put in all weather conditions. Skipping this type of under layer may cost you money down the line, so we think that you should consider building the cost of these affordable plastic “paving grids/gravel grids” into your budget, right from the very start.
The best gravel grid designs are crafted from eco-friendly plastic. They make it possible for gravel driveways to handle a lot more weight and this is a good thing.
When shopping for them online, you’ll find that they are sold in interlocking panels. It’s easy to choose the right amount of panels as long as you’ve taken accurate measurements of the length and width of your driveway space. Look for manufacturers who offer gravel grids with warranties. Also, look for gravel grid products which are highly-rated.
Start the New Project
After you take measurements, make a list of supplies, make a budget and order the supplies, you’ll be ready to get the job started. It should begin with creating a smooth surface for the under layer.
Start by Cleaning Away the Rocks
Do this by clearing away rocks and other debris from the earth. in some cases, you may need to remove grass in order to reveal the dirt underneath. Smooth the dirt so that it’s all even. Then, put down the interlocking “honeycomb” gravel grids.

Put Down the Gravel Layers
Once you do this, you’ll be ready for the next step, which is putting down your gravel layers. Just add the gravel and then use a rake in order to create a smooth layer.
Add More Layers
Keep adding layers and smoothing them out. Everything should be very even. When you’re done, the driveway should have the same height overall, from the base of the driveway to the end of the driveway.
Stop Gravels from Spreading Once for All
Even if you take corrective measures, it’s not always possible to keep the gravel stuck at the place you want it.
Gravels are great ways of adding character to your home’s pathway. These can also act as beautiful paving materials. You can have 3 inches of gravel and use boarders and tamping and packing.
However, those methods are temporary fixes and don’t always keep the gravel stuck in one place. If you want to get rid of the problem forever, it’s best to use efficient pavers to keep them fixated in one place.
It will keep the gravel fixed in one place and give it a professional and clean-cut look. Remember to use eco-friendly and durable pavers that last long to achieve a more aesthetic look at the driveway of your home.
Finishing Touch
The care that you put into planning is really important! Hopefully, our detailed guide will help you to create a gravel driveway that resists washing out. If you follow the steps that we’ve listed here, your gravel should stay put most of the time. Gravel driveways are typically more affordable than paved driveways, and they are less permanent, too, which can be a good thing in certain circumstances.
If you want to build this type of driveway and keep it looking good in the long term, we recommend that you follow our tips today. We’ve used experts’ advice to help you construct a gravel driveway that will never wash out. If you’re going to hire a pro to build your gravel driveway, be sure to request gravel grids, as they definitely help to stop the washout.
Read Also: